“Isn’t it supposed to be green?”
NHS Barnsley
Lemniscate sculpture July 23rd – September 18th 2023.
On 23rd July 2023 the Barnsley Facilities Services office followed up on an email from 23rd January 2023 confirming that we were ready to proceed with manufacture as soon as we were paid. Their email stated that they thought the order had been raised earlier, said we would have it tomorrow and could we finish in time for Organ Donation Week which is 19th September 2023. I replied that “To answer your question, if I start now and everything goes well then yes, 18th September is achievable. I’ve got enough kit to start work on the build but I will need the money to buy the silicon and the resin within the next three weeks. I can’t start literally straight away as I’m away until Monday 31st.“
The last time I referred to this project, or illustrated it was in this blog post – ‘Gardens Project 12: First Post in Three Months’

building the lemniscate
29/07/23
This is a step by step guide to how it happened. I started earlier than I said as I had some materials. This is the first stage of the lemniscate on a wire frame wrapped in mesh and cotton scrim.

progress
01/08/23
I continued to build up the layers to around 100mm girth and balance the shape, but pressures of time meant I couldn’t take the form apart and rebuild the parts that weren’t perfect. I had to build it as close as I could and then sand it back.

finishing (somewhat earlier than ideal)
08/08/23
After a week of adding and sanding I’d reached this form and I had to accept that this was it for the master.
“Isn’t it supposed to be green?”
I am still trying to get in to the studio as often as possible

Beginning the mould making
16/08/23
So I coated it with release agent, and Vaseline eventually. I use clay walls and laid the plaster on to about 25mm thickness. I decided that if I made the mould as three sections around the circumference I’d avoid problems with removing it.

Turning the mould
17/08/23
The next day I turned the piece over and repeated the process with the second run of mouldings.

The finished mould
19/08/23
A couple of days later I applied the final layer.

marking up for removal
20/08/23
And after a day drying, nowhere near long enough, I marked up the mould and
“Isn’t it supposed to be green?”

back to the original
20/08/23
Took the sections off.

the numbered and marked sections
20/08/23
In the end there were 23 parts to the mould. If I’d been a bit braver I might have reduced this to an even dozen. Hindsight is marvellous.

fixing the mould together
26/08/23
So then I put the mould back together after the parts were vaselined for release. This was a pain as the markings disappeared as the mould wasn’t dry enough.

the assembled mould
27/08/23
But here is the hollow mould on the 27th August. I’m awaiting delivery of the resin I was able to order on the 25th when I got payment.

plastering the gaps
30/08/23
On the 30th the resin arrived, and extra plaster so I was able to finish the exterior to prevent leaks.

turning the mould
30/08/23
The mould had to be turned to facilitate this and the process took about 2.5 hrs.

ready for the pour
31/08/23
The lemniscate upended to allow for resin pouring. The pour was made in three parts, the first 15kg over around an hour when there were small leaks around some lower joints. Plaster of Paris was applied to seal these and the mould was left for 45 minutes to allow the resin to reach gel consistency. Then the next 20kg of resin was poured and the process with small leaks was repeated. After another hour, around 4:45 pm the last pour of about 10kg was made. A small amount of Plaster was again used to close a couple of small leaks.

the ‘workshop’
31/08/23
The “workshop” with the lemniscate covered and used resin containers in the background.

the mould is full
31/08/23
The hardened resin at the top of the mould at 8pm on the 31st August. The lemniscate is covered and the resin left to cure for five days.
“Isn’t it supposed to be green?”

building the plinth
02/09/23
Building the plinth

the top of the plinth
02/09/23
The plinth comes in two parts and the lemniscate will be secured by the two aluminium posts on the top. I have the feeling it’s too tall.

the broken original
02/09/23
The original lemniscate was being used as the test piece for the top of the plinth so I could place the holes to secure it. Unfortunately it broke into three pieces before I could test it.

fixing the original
03/09/23
Obviously I still needed to test the positioning of the lemniscate so I have to repair the original. This image shows two of the three pieces placed together ready to be fixed, you can see the connector piece on the left and just about see the break on the extreme left at about 10 o’clock.

cleaning the cracks
03/09/23
A close up view of the break on the left of the photograph above.

fastening the third break
03/09/23
The third piece of the broken lemniscate ready to be fastened. You can see the repair to the right hand side of this break that needed fixing before the whole piece was tied in.

the completed original
03/09/23
The three pieces tied together and left to set. I used plaster of plaster for these with a low water mix for strength and cotton scrim to bind it together. The picture is distorted as as I had to hold the camera above my head to get it all in even with the phone zoomed out as far it would go.

releasing the cast
“Isn’t it supposed to be green?”
05/09/23
The lemniscate coming out of the mould. The mould failed in several places, you can see the spots of plaster stuck to the body at the top left and the mid right. Also the broken broken mould at top right.
While all this was going on I was also visiting the studio, just not as often as I would have liked.

the three pieces fressh from the destroyed mould
05/09/23
The lemniscate almost fully released and in three pieces with very large cast marks where the mould failed to match accurately.

plaster cleaned off
05/09/23
The three pieces of the lemniscate after a first wash. The breaks are pretty much face to face, there are no air gaps, so I should be able to fit the pieces together and fix with epoxy.

grinding the three sections
06/09/23
The cast marks were ground off the separate pieces while I worked out what to do to tie them together.

fixing the breaks
07/09/23
The fixing process for the three pieces, metal rods are drilled into the sections fixed with clear epoxy.

the assembled cast
07/09/23
The three sections fixed together, the epoxy will cure overnight and the piece should be ready for polishing.

cleaned, and a first polish
08/09/23
The lemniscate after a first polish and the removal of the excess rebar.
“Isn’t it supposed to be green?”

the workshop – the aftermath
08/09/23
The aftermath in the working space as I move back closer to the house.

the reduced plinth
09/09/23
The plinth with the lighting solution being installed.

“Isn’t it supposed to be green?”
09/09/23
“Isn’t it supposed to be green?”
This is why I really don’t like commissions, there is a apparently a requirement for the piece to be green as this is integral to the original design. I had no idea that this was the case and found out on Friday, the 8th September, so now it will be green. It will be a bit more of a sap green than the viridian above.

sanding and polishing as much as possible in the limited time available
11/09/23
Sanding the piece as smooth as possible in the limited time available.

Green
11/09/23
Now, it is green, having searched through six year old emails I found the relevant design sheet.

Victoria Hardman’s design sheet
11/09/23
I have a note somewhere about displaying the figure of eight horizontally so people would recognize it as infinity, but it just hadn’t registered that ‘green’ was referring to the colour and the eco credentials.

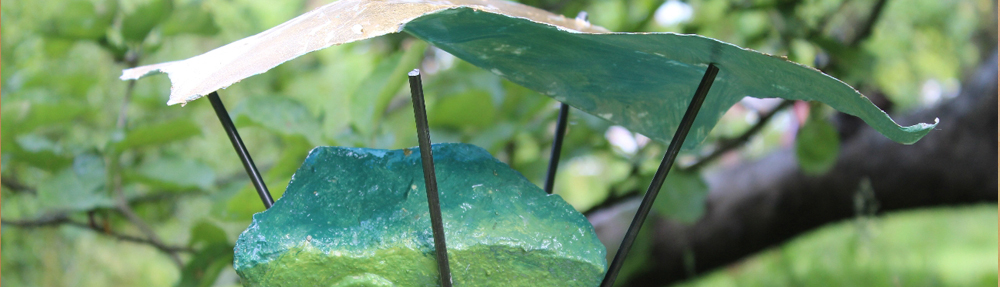
plinth with original top
12/09/23
The final part of the project was to fix the plinth so that light shines up onto the lemniscate.
Interestingly the support tubes on the plinth above are 540mm apart.

cured lemniscate
12/09/23
The posts fixed to the lemniscate here are 530mm apart. The resin continues to cure and the piece has contracted by 10mm over the past week. So this meant I needed to make a new top for the plinth.

Organ Donation Memorial for NHS Barnsley
12/09/23
This is the final piece with the new top and lights fitted, all that remained was for the lemniscate to be given a coat of lacquer to seal the colour.


